October 28, 2013

Celebrating 9 years at a bed & breakfast

This past weekend Mr. H and I celebrated our 9th wedding anniversary.  We always make sure to take a little getaway to celebrate.  This year we are planning a trip to Europe over Christmas so we decided to keep our anniversary trip low-key and just drove an hour north to spend the day in Fort Collins.  After doing some research on Tripadvisor (I love that website) we picked Edwards House Bed & Breakfast.  In recent years, Mr. H and I have become big fans of bed & breakfasts. They're just so personal and make you feel so much more at home than a big chain hotel.
photo from Edwards House Bed & Breakfast website

The bed & breakfast is in a beautiful home built in 1904 in Old Town Fort Collins.  


If you didn't feel fall in the air here, you won't feel it anywhere!


  There are nine guest rooms and we stayed in the Lady Moon Room. You can't see it in the picture but the room has a gas fireplace which was perfect for the chill that night.
      
I love the small details of an older home: the door bells, stained glass, pink tulip lamps.


As you may know, I love copper and this copper coal bucket caught my eye. I love the copper (of course), the lion head detail on the side, and the blue and white porcelain handle.


One of the things that sets a bed and breakfast apart from a hotel are the small touches that the innkeepers leave around to make you feel at home like these freshly baked cookies. 

It was a nice, relaxing getaway. I'm already thinking of our big 1-0 next year! Maybe a trip back to France is in order for that one!

October 24, 2013

Sew obsessed

When I started blogging back in June, my goal was to post something at least twice a week...well, it's been a week since my last post so I'm a little behind and here's my reason for it...I've become completely obsessed with sewing! I mean obsessed. I think about it at work, I think about it when I'm having dinner, I think about it when I'm hanging out with friends. I work it into conversations. It's gotten so bad that I'll get a faraway look in my eyes and Mr. H will ask "What are you thinking about?" and I'll say, "Nothing" and he'll say, "Oh you're thinking about sewing again, aren't you?". So whenever I get free time, I'm at the fabric store, behind the sewing machine, or on the internet looking for sewing inspirations.  That's where I found my current sewing obsession...baby bonnets!

photo from Sew Mama Sew
Look at that bonnet.  How cute is that? I found it on www.sewmamasew.com and had to try it. My good friend Jamie is expecting a baby girl, well, she actually had her two days ago.  Guess who gets to be my guinea pig for my first bonnet, baby Gianna! I used some of the fabric I had left over from the quilt I made for her. There were two tricky parts.
1) The materials that were needed included picot edge double-fold bias binding which I could not find in any store so I made my own! I bought pink double folded bias binding and lace trim and sewed them together.
2) Making the spaghetti bias binding for the adjustable closure in the back took me an hour, literally an hour, to do. It's almost impossible to turn such a skinny strip of fabric in on itself. 
craftyendeavors
I found a method that finally worked on craftyendeavors.blogspot.com. It involved cutting a tab and then using a bobby pin to pull one end of the strap in on itself. It sounds easy until a seam rips or the tab rips off the bobby pin. It took several ruined strips for me to get this done but it finally worked!

Here is the bonnet for Gianna. It's reversible!
             
Pesky drawstring that took forever to make

I also decided to make a Christmas bonnet since it's just two months away!  It's reversible too!  I'm putting this one in my Etsy shop. I'm so excited to make more!


October 17, 2013

Creating color palettes with Photoshop

I have a new discovery to share with all of you! Yesterday I was messing around on Photoshop trying to find a specific color to match one I already had in a photo and found a way to make color palettes from photos I already have. It's so much fun!  Now, if you already know this super fun technique, I apologize. I am known to be a little behind when it comes to technology and most things involving the computer.  But if you'd want to learn how to do it, I have instructions below.

Here are some photos that I've taken and created color palettes for. 


Aren't they neat? It was so fun creating the palettes. I think having a color palette can be so useful for home decor. For instance, if you had trouble deciding what colors to add to a room, you could take a photo of the room and create a color palette from it.

The rest of this post is instructions on how I did this so if you're not interested in reading a confusing list of instructions, feel free to bid me adieu until next time!  For my blog friends, if after reading the instructions, you still can't figure it out but have a photo you'd like to create a palette for, feel free to email it to me and I'll do it for you and send it back!

Now, I am absolutely the last person you should ask about how to use Photoshop. Everything I ever do in Photoshop, I either ask Mr. H, find a YouTube tutorial or drive myself crazy trying to figure it out on my own which is how I discovered this. Usually after I figure out whatever it was I was trying to do, it leaves my brain so I never remember how to do anything. So this is as much for me as it is for you. I hope I don't leave out anything but if you find that I did, please let me know! I have Photoshop CS5 Extended so I'm not sure if the steps would be the same for other versions of Photoshop.

1) Open Photoshop and open up the photo you want to make a palette of

2) Under File, chose Save for Web & Devices

Your photo will pop up with swatches of colors to the right of it. Mine defaults as a GIF file so I just leave it.

3) The only setting I change is the "Colors" setting. It sets how many color swatches you will see. I chose 128, enough to get a good selection but not too much to be overwhelming


4) In the Color Table section on the right side of the table there is a Color Palette Menu. It looks like an upside down triangle with four lines by it. Click on this and select Save Color Table. Name your table and save it wherever you want. Click Done


5) Now you are back at your original photo. Go up to the Swatches tab (upper right of screen) and click on the drop down menu (the upside down triangle with 4 lines next to it) and select Load Swatches or Replace Swatches. Load Swatches will add your new palette to the ones already there. Replace Swatches will remove the ones already there and replace them with your new color palette.  I like Replace Swatches so I don't have to guess which are the new colors


6) Find where you saved your new color table. You may have to change the Files of type section at the bottom to .ACT. Click on the file.


Now you're ready to start creating your palette!

7) Choose the Rectangle Tool or whatever shape you want. I like the Rounded Rectangle Tool


8) Go to Swatches and chose your first color


9) Go to your photo. Make sure you are on the Background layer.  Click and drag the shape to however you want it. When you let go, the color will fill in


10) Repeat with each color you add. Make sure you click on the Background layer after each new color you choose because as you add colors, a new layer is created and it won't let you change the color if you're not on the Background layer


11) When you are done, save it as you normally would save any photo 


12) If you chose Replace Swatches in step 5, remember to Reset Swatches when you are done or the next person using Photoshop will wonder what happened to the colors. Do this by going up to the Swatches tab and clicking on the drop down menu. Select Reset Swatches. It will ask you "Replace current color swatches with the default colors?" Click OK.

October 13, 2013

Pink toile nursery rhyme baby quilt

So you may be wondering what I've been doing these past couple weeks...even if you're not wondering I'm gonna tell you anyway. Making baby quilts!  Yes, the girl who has been telling you that she's not a seamstress has made three baby quilts over the last two weeks! And I will still say I'm not a seamstress since I can't make anything else, but I am a baby quilt maker!  

Two of the quilts are going to be gifts so I can't show them to you just yet, but I found this pink toile with scenes from nursery rhymes on it and just had to get it because I love toile! Plus those two quilts that I can't show you are both for baby boys so I was itching to do something girly.


I also found a pretty green print with ivy made from hearts and knew it would complement the pink toile perfectly. A white quilted fabric for the backing would complete the look.  

Here it is all finished!


You may have noticed that I've learned how to do binding since the last quilt I shared with you! YouTube sure is handy! I think binding gives the quilt a finished look.

I discovered something that I never knew about myself, that I LOVE sewing, well, maybe not sewing in general, but I love making baby quilts! I love the process of it as much as I love seeing the finished product. I love picking out the fabric, laying it out and seeing that I can make something useful and cute! 

I've decided to add them to my Etsy shop. Now, I promise my blog will not become advertising for my Etsy shop, but I thought I'd share that I'm adding a new category that I'm so excited about it! Also, if I may ask those of you who have Etsy shops, do you have any tips to share that you've learned along the way? I've not sold anything yet and I know I just started but any advice would be appreciated so much!

I'm sharing with:

Fluster Buster

October 8, 2013

Lavender harvest time!


Taking a cue from some of my blog friends, I saw now was the time to harvest my lavender!  This past spring I planted eight lavender plants and over the course of the summer four of them died.  I really can't figure out why they died.  They were in the same section of the yard as the ones that survived.  They were watered the same and got the same amount of sunlight.  They didn't all die at once either, they each thrived then slowly died over the summer. 


I was able to get a small bundle from the four plants that survived and the aroma is heavenly! I read that Denver (and most of Colorado) has the perfect zoning for lavender so next year I will replace the plants that died and hope they do better! I would love any suggestions from those of you who have had luck with lavender plants.


Here is the lavender all dried and pretty...just kidding. This is my stunt lavender that I already had. The lavender from my yard is still drying and not nearly this purple.  I just liked the way the light was shining on them.

October 5, 2013

Thank goodness I'm still alive to announce the winner of the herb box giveaway


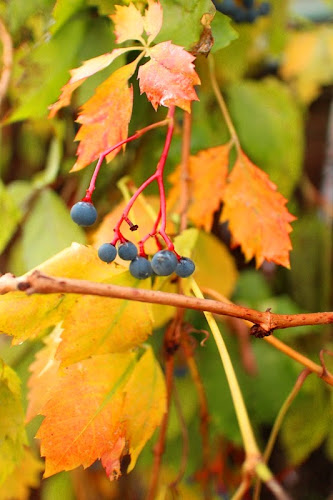
I thought it would be fun to include a pretty fall photo to announce the winner of the herb box giveaway.  I looked outside and saw the pretty leaves on these vines and found my photo op.  I was curious about what these berries were that looked like small grapes so I bit into one to see if it tasted anything like grapes (I know, not the smartest thing to do but I admit I taste random fruit sometimes).  It didn't taste awful but it didn't taste like grapes either.  

I spent some time Googling "what are the vines that have berries that look like small grapes" and all I could find were "wild grapes" but I knew the leaves didn't look the same.  Well, later that evening I visited my blog friend Maureen at It's All Connected and saw a pretty fall arrangement she made with Virginia Creeper and it looked just like the vine in my yard!  I Googled Virginia Creeper and according to Wikipedia the berries "contain oxalic acid, which is moderately toxic to humans".  Eek!  Well, I'm still here and I feel okay for now. 

Okay so after that little story, a random number was selected and the winner of the herb box is:  
Vel Criste from Life & home at 2102 

She said she would put real herbs in it to use for cooking.  I love that idea!

Thanks to everyone who entered. You had such wonderful ideas for what to put in the box.  Also, thanks to everyone for their well wishes for my Etsy shop!  If you are still interested in one, please visit my shop! You can find the link on my side bar.

October 2, 2013

Artist Mary Qian demonstration

Liberty
Last month I introduced you to artist Stephanie Birdsall. Today I'm even more excited to introduce you to artist Mary Qian (pronounced like Chien).  From the moment I found out that Mary would be doing a demonstration at Saks Galleries I was giddy with excitement.  I love her work!  LOVE IT! LOVE IT!  

Mary paints florals and figurative.  I am a huge fan of her figurative work so I was hoping she'd be painting a person for her demonstration but I didn't let my hopes get up too high because I knew florals would be much easier to set up.

When we showed up Mary was already painting and it was a figurative!  I can't even begin to describe how my craziness and excitement went off the charts and I couldn't even sit down.  I'm sure Mr. H wanted to hide and not claim me as his wife that afternoon.  I know I must sound like a fan meeting a celebrity or something, but to me it was sort of like that since I loved her work so much.

As she painted she described using techniques of hard and soft edges to keep the viewers eyes on the canvass.  She talked about using a light easel so she can carry it around if she is painting on site.  


She even uses styrofoam plates instead of a traditional paint palette because they're so much lighter to hold for extended periods of time. 

I love this one of the model taking a picture of her portrait. Can you just imagine if Mona Lisa or The Girl with the Pearl Earring jumped up after their sittings to take a picture of the painting?  

My favorite work of hers is "An Innocent Gaze". I just love the girl's face, how serene it looks.  I also love the colors in the painting.

An Innocent Gaze
Here are some other ones I love.
Passing Times
Lily
Winter

After going home and obsessing thinking about it for a few days, we went back and purchased An Innocent Gaze!  Here it is in my dining room. I just love it so much and make it a point to sit down and truly appreciate it for a few minutes each day.

If you'd like more information on Mary, here is her website www.maryqian.com

Don't forget to enter my giveaway if you would like a chance to win the herb box made from a wine crate.  Just visit my previous post for details! 

LinkWithin

Related Posts Plugin for WordPress, Blogger...