Showing posts with label Asian inspired. Show all posts

August 4, 2013

Mango sticky rice "birthday cake"

We had a birthday party for Mr. H yesterday and instead of a traditional birthday cake I thought it would be fun to make mango sticky rice for his "birthday cake".  It's a very popular dessert in Thailand and Laos and pretty easy to make.

The key to perfect deliciousness is ripened sweet mangoes.

You will also need glutinous rice.  This is also referred to as sweet or sticky rice.  It is not the same as standard white rice.  The rice on the left is the standard white rice which is cooked in water.  The rice on the right is glutinous rice.  As you can see, it's more opaque.  It is cooked by steaming it over water.  After it's cooked, it has a sticky texture.

 Here is what you will need for 4 servings:
  • 2 to 3 ripe mangoes (peeled and sliced)
  • 2 cups glutinous rice
  • 1 cup coconut milk
  • 1/2 cup palm sugar (you can find this at an Asian grocery store)
  • 1/2 teaspoon salt
  • Toasted sesame seeds for garnish
Here is what to do:
  1. The night before, soak the rice in water.  If you don't do this, it will not cook properly.
  2. After it's been soaked, cook the rice in a metal or bamboo steamer.  Line it with something like cheesecloth so the rice doesn't fall through.  Make sure the rice is being cooked over the water by steam, not in the water.  It will take about 15-20 minutes for the rice to cook.
  3. As the rice is cooking, make the sweet coconut milk sauce. Heat the coconut milk, salt,  and palm sugar in a sauce pan until the palm sugar dissolves. Lower the heat to a simmer to allow the sauce to thicken slightly then set it aside.
  4. Peel and slice the mangoes
  5. By this time, the rice should be done. Transfer the rice to a bowl and break it apart to allow the steam to escape. Shape it into 4 individual mounds on separate plates. Pour the coconut milk sauce over the rice and arrange the mango slices as you like.  Top with sesame seeds and enjoy!


I am sharing with:

July 30, 2013

Cherry blossom sink inspired bathroom

Back in 2009, Mr. H and I took a little trip to Taos, New Mexico.  While there we visited a local furniture shop and a vessel sink caught my eye.  It was black and red with cherry blossoms inside and on the front.  It was love at first sight.  I was inspired to design a guest bathroom around this sink when we moved into a bigger house someday.  We bought it and stored it in the basement still in its wrapping.

Fast forward to 2013, we were in the new house and it was time to renovate the guest bathroom!  I had not seen the sink in four years because I wanted to forget what it looked it and have it be a surprise to myself when I saw it again.  I was kind of nervous as Mr. H unwrapped the sink.  I hoped I would still like it as much as that day four years ago...and I did.  I still loved it.


Now  it was time to find a vanity for the sink to sit on.  I wanted to stay with the Asian style of the sink.  Here are a couple options I thought would work to give you an idea of the look I was going after:

Source
Source

Although I loved the look of these vanities, their price tags were not in our budget.  I had to consider a different option...what about a dresser or maybe a night stand that could be turned into a vanity?   Something like this:

Source
I loved this red Chinese cabinet,  but it was too wide for the space. 

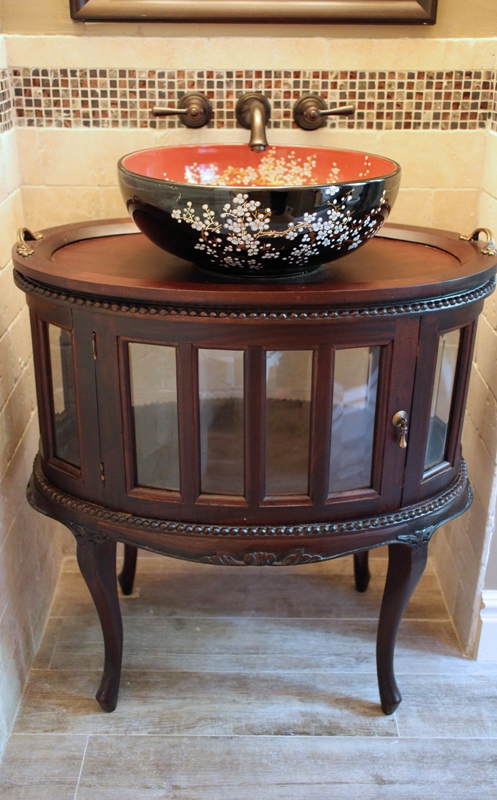
Then on a trip to Nebraska (both Mr. H and I grew up in Nebraska and both of our families are still there) we stopped at an antique shop and found the perfect solution!  It was a curio with a removable tray on top.  There were doors on the front and back so the back one could be removed to allow plumbing to pass through.  With the dark wood and the curved legs, I thought it would complement the Asian look I was going for and it was only $160!  This was what we were looking for and we took it home.


Our plumber drilled the hole for the drain, placed the sink on top and installed the fixtures.  It turned out beautifully!  Here is the finished product.


If you'd like to go the route of using a non-traditional vanity for a vessel sink, here are some things to keep in mind:
1) Take into consideration the total height of the sink and vanity once the sink is placed on top.  While shopping around, I found the average height of a bathroom sink to be around 35".
2) Make sure the vanity is deep enough to accommodate the sink and plumbing fixtures.
3) Decide if you are going to replace the top of the vanity with a countertop or keep the current top.
4) If the vanity is a wood product, protect it with some kind of finish so it doesn't get water damage. Our contractor sprayed a low sheen wood protectant on our vanity.
5) Decide what kind of faucet you will use.  If you choose a vanity mounted style, more holes will have to be drilled into the vanity to accommodate the fixture.

July 1, 2013

Inspired shower tile design

 
As I mentioned in a previous post, I love looking at www.houzz.com for design inspiration. When it came time to remodel the guest bathroom I spent hours on that site gathering design ideas. When I came across this tile design on houzz (on the left), I knew it was exactly what I wanted for the shower. I loved how the tiles were vertical below the accent tiles and horizontal above. For my shower (on the right) I used beige travertine tiles and brown glass accent tiles. I would have loved to have done the pebble flooring but we decided to re-use the existing shower pan instead of tiling the floor.

 
Here is a close-up of the glass accent tile.

LinkWithin

Related Posts Plugin for WordPress, Blogger...